What Makes a 3D Printer (FDM Basics & Core Components)
A beginner-friendly breakdown of FDM 3D printing and the essential components behind every printer build.

People often ask me what kind of 3D printer to get - but I realized most of them don’t even know what a 3D printer really is.
Not just what it looks like, but what goes on under the hood.
This post is for those of you curious about how 3D printers work - especially if you’re thinking of buying or building one. I’ll walk through the core components and how they all come together to melt plastic into something useful.
Let’s keep it simple and grounded - just like how I started.
What’s an FDM Printer?
I’ll focus on FDM (Fused Deposition Modeling), because that’s what most home and DIY printers use.
It melts plastic filament and draws each layer of your design, one on top of the other.
Side note: There are resin-based printers (SLA, DLP), and powder-based ones (SLS) - but FDM is the one most of us start with. It’s budget-friendly, moddable, and open-source heaven.
Core Components (Explained Simply)
You should try to remember these - not just to understand how printers work, but because you’ll need this knowledge when troubleshooting, upgrading, or fixing things later. Trust me, it’ll save you a ton of time.
Frame
Usually made from aluminum extrusions. This is the skeleton.
If you’re into DIY, you’ll love how modular and expandable this is.
Some prebuilt printers use molded plastic or stamped metal, but for tinkering and customizing, aluminum extrusion is the go-to, especially for RepRap-style designs.
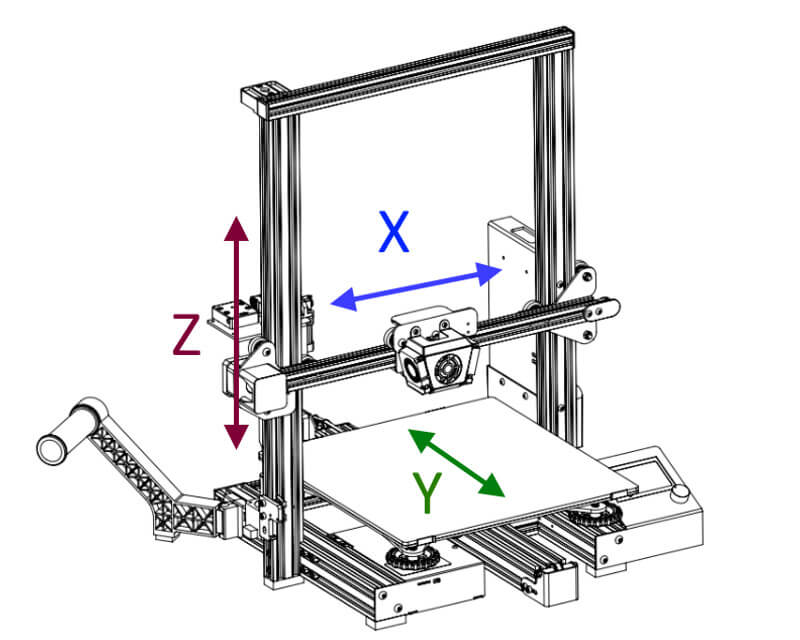
Movement System
The printer moves in three axes: X (left-right), Y (front-back), and Z (up-down).
Motion is typically achieved using:
- Belts (for fast, light movement - often X and Y)
- Leadscrews (for precise vertical movement - usually Z)
- Linear rods or rails (for stability)
- Pulleys & couplers (to transfer motion cleanly)
Delta printers move differently using arms - but we’ll get into that in the next post.
Stepper Motors
At least four stepper motors:
- One for each axis (X, Y, Z)
- One for the extruder (pushes filament)
Some printers use dual Z motors for stability, or direct drive extruders mounted on the hotend. Others use a Bowden setup, where the extruder is off to the side and pushes filament through a tube.
Steppers are precise, affordable, and programmable - ideal for makers.
Extruder & Hotend
- Hotend: heats up to 180–260°C to melt filament
- Extruder: pushes filament in (can be gear-driven or simple pinch roller)
Cooling and quality here matter a lot. A clog or bad filament path = failed prints.
You’ll hear terms like “All-Metal Hotend” or “Direct Drive” - don’t worry, we’ll break those down in another post.
Print Bed
This is where your object prints. Beds may be:
- Heated: helps with adhesion and reduces warping (especially for ABS)
- Glass, PEI, magnetic flex plates: all have pros and quirks
You’ll learn what surface works best through experimentation.
Some people even use glue sticks or hairspray. (Really.)
Personal note:
Since FDM is all about temperature control, a heated bed is my recommendation.
Keeping the bed temperature near the material’s melting point helps it stick.
Warping happens because prints shrink internally - stable temperature is key.
Some people use glue sticks or hairspray (really), but you shouldn’t have to. Dial in your temperature settings instead.
Cooling Fans
There are two main fan types:
- Hotend fan: always on - keeps heat from traveling up the filament path
- Part cooling fan: cools the plastic after it’s laid down - critical for overhangs and details
PLA loves cooling. ABS hates it. Knowing when to cool is a craft.
Mainboard
This is your printer’s brain. It reads G-code (instructions from the slicer) and turns that into motion, temperature control, and feedback.
Firmware like Marlin, Klipper, or RepRapFirmware runs here.
You can customize it - or even write your own features, if you like pain.
DC Power Supply
Most printers run on 24V (older ones use 12V).
Power matters: underpowered systems lead to layer shifts or full shutdowns mid-print.
If you’re building your own, don’t skimp on the PSU. Safety matters.
Sensors
- Endstops: simple switches that tell the printer where “home” is (0,0,0)
- Thermistors: temperature sensors for hotend and bed - they let the controller maintain correct, stable temperatures
Some printers add filament runout sensors, auto-bed leveling probes, and even accelerometers (for advanced tuning).
User Interface
Basic UI: rotary knob + small screen.
Advanced UI: full-color touchscreen with presets and network access.
You’ll use this mostly to:
- Preheat
- Load/unload filament
- Start prints from SD card or USB
Why You Should Care
If you want to:
- Choose between printer kits with confidence
- Upgrade your setup
- Troubleshoot weird noises, clogs, or shifts
- Build your own printer from scratch
…then this foundation matters. It’s like learning how a car works before racing it.
In the next post, I’ll cover how different FDM printer designs (Cartesian, CoreXY, Delta) organize these parts - and why that matters for your build style.